Chaikin's Algorithm In SwiftUI
Many of you are probably familiar with Bézier curves and how they create smooth paths and designs, but did you know there's a simpler way to get a similar results?
I came across this blog post yesterday that introduced me to Chaikin's Algorithm, , and after spending an afternoon experimenting with it, I knew I had to write about it.
What is Chaikin's Algorithm?
Chaikin's Algorithm is a simple method to smooth out a rough polygonal line into a nice, smooth curve. It works by repeatedly adding new points along each line segment, at 25% and 75% of the way between the original points, and then connecting these new points. Every time you do this, the line gets smoother and smoother.
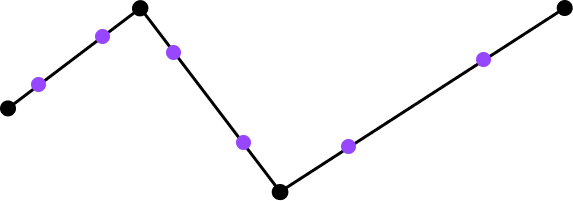
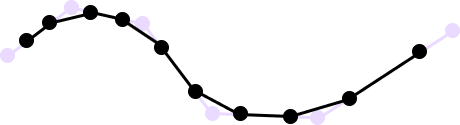
Let's apply the algorithm to this starting set of points:

Next, we'll add new points at 25% and 75% of the way along each line segment.
We'll look at how we calculate these points in a minute, but for now we'll just estimate it.
Now, let's combine just the new points together:
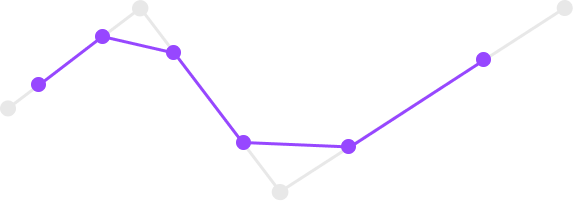
You'll see that by effectively cutting off the corners, we've achieved a more curved appearance.
Let's do it one more time.
We'll start again by adding new points along each of the new line segments:
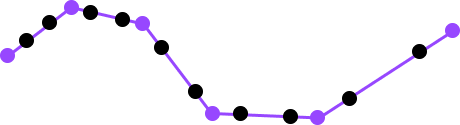
And then connect them:
We can see that in just 2 iterations we've transformed our initial jagged line into a much more pleasant curve.
Calculating Control Points
To calculate the control points at 25% and 75% along a line segment, we need to use linear interpolation (a.k.a. lerp). It sounds fancy, but it's simply a way of finding a point that is some percentage of the way between two other points.
If you're already familiar with this concept, feel free to skip to the next section. Or, if you're interested in exploring the relationship between different interpolation approaches and how they relate to animations in iOS (UIKit & SwiftUI), check out my earlier blog post:

We'll start by looking at the linear interpolation formula and then we'll look at an example:
L(t) = (1 − t) ⋅ P0 + t ⋅ P1
L(t)is the interpolated point.tis the interpolation parameter which ranges from 0 to 1.- When
t = 0,L(t) = P0. - When
t = 1,L(t) = P1.
- When
P0is the starting point.P1is the ending point.
So, if we wanted to figure out a point that was 25% of the way between P0 and P1, we'd just have to evaluate this expression:
L(t) = (1 - 0.25) * P0 + 0.25 * P1
L(t) = (0.75 * P0) + (0.25 * P1)
In practice, we'll use this formula to calculate a new control point's X and Y coordinates individually.
Implementing Chaikin's Algorithm
Now that we know how the algorithm and linear interpolation work, let's create an interactive version of it in SwiftUI.
Here's the main algorithm's implementation:
func chaikinAlgorithm(points: [CGPoint], iterations: Int) -> [CGPoint] {
    // We want to preserve the starting and ending points, so let's save them.
    guard points.count > 2, let startingPoint = points.first, let endingPoint = points.last else { return points }

    var currentPoints = points

    // We know the more iterations we do, the smoother the curve.
    for _ in 0..<iterations {
        var newPoints: [CGPoint] = [startingPoint]

        for i in 0..<currentPoints.count - 1 {
            // Gets adjacent points
            let p0 = currentPoints[i]
            let p1 = currentPoints[i + 1]

            // Calculates the position of the new control points
            // via linear interpolation
            let q = CGPoint(x: 0.75 * p0.x + 0.25 * p1.x, y: 0.75 * p0.y + 0.25 * p1.y)
            let r = CGPoint(x: 0.25 * p0.x + 0.75 * p1.x, y: 0.25 * p0.y + 0.75 * p1.y)

            newPoints.append(q)
            newPoints.append(r)
        }

        newPoints.append(endingPoint)
        currentPoints = newPoints
    }

    return currentPoints
}
To render the points and curve in SwiftUI, we can use Path:
var body: some View {
    ZStack {
        // Draw the points where the user taps
        ForEach(points, id: \.self) { point in
            Circle()
                .fill(Color.blue)
                .frame(width: 10, height: 10)
                .position(point)
        }

        // Draw the smoothed curve
        Path { path in
            guard !smoothedPoints.isEmpty else { return }
            path.move(to: smoothedPoints.first!)
            for point in smoothedPoints.dropFirst() {
                path.addLine(to: point)
            }
        }
        .stroke(Color.red, lineWidth: 2)
    }
    .background(Color.white)
    .onTapGesture(coordinateSpace: .global) { location in
        points.append(location)

        // Perform Chaikin's Algo every time we add a new point
        smoothedPoints = chaikinAlgorithm(points: points, iterations: 3)
    }
    .edgesIgnoringSafeArea(.all)
}
Putting everything together, we can now define any line and generate a curve that matches it's shape.
1 Iteration
3 Iterations
5 Iterations
You can find the full source code here.
Chaikin's Algorithm vs. Bézier Curves
Both Chaikin's Algorithm and Bézier curves are essential tools for creating smooth curves from a set of control points. They are widely used in graphic design, animation, and UI/UX design to generate appealing shapes and paths. One key similarity is that both methods can be applied iteratively to increase the smoothness of the resulting curve. With Chaikin's Algorithm, each iteration adds new points and refines the curve, while Bézier curves can be subdivided further to achieve a similar effect.
However, there are significant differences between the two. Bézier curves are mathematically more complex, requiring polynomial equations and manipulation of control points to define the curve. In contrast, Chaikin's Algorithm is straightforward, using simple linear interpolation between points. Bézier curves are defined by a specific set of control points that directly influence the shape of the curve. Moving a control point will change the entire curve's shape. Chaikin's Algorithm, however, generates new points along the line segments, gradually smoothing the path without direct manipulation of the original control points.
In terms of applications, Bézier curves are widely used in vector graphic design, font design, and path animation due to their precision and control. On the other hand, Chaikin's Algorithm is more commonly used for quick and easy curve smoothing, particularly in applications where simplicity and efficiency are more critical than precise control over the curve's shape. In summary, while both Chaikin's Algorithm and Bézier curves are powerful tools for creating smooth curves, they cater to different needs and levels of complexity. Chaikin's Algorithm is ideal for quick, easy smoothing, while Bézier curves offer greater control and precision for more complex designs.
If you're interested in more articles about iOS Development & Swift, check out my YouTube channel or follow me on Twitter.
And, if you're an indie iOS developer, make sure to check out my newsletter! Each issue features a new indie developer, so feel free to submit your iOS apps.
 Indie Watch